Introduction
Docebo Connect acts as a connector between your platform and third-party SaaS systems, helping you to integrate your platform with more than 400 third-party external systems, reducing the integration effort.
Docebo Connect offers a large catalog of connectors for the most popular SaaS systems, to manage automated workflows (called recipes) shared among systems in order to exchange and share data on the basis of triggers.
Please note that Docebo Connect takes advantage of the APIs and business logic already existing in the integrating systems and does not create new ones. In addition, Docebo Connect does not manage SSO flows with Identity Providers (such as SAML, OpenID Connect, etc), JavaScript integrations (such as Google Analytics or Google Tag Manager) or iframe integrations (such as Docebo OEM or Salesforce Canvas).
The purpose of this article is to help you familiarize yourself with the various common recipe actions you will perform using Docebo Connect.
For more information on the definition of terms and concepts used throughout this article, please read Docebo Connect Glossary of Terms.
Warning:
The default Docebo connector must never be moved, renamed or deleted. Doing so may render your recipes non functional or even disable the connection to your platform.
Cloning a recipe
Cloning a recipe in Docebo Connect allows you to create a copy of the recipe and move it to a new folder or project. The cloned recipe retains a link to the original recipe so that when a new version of the original recipe is released by Docebo, you will receive a notification in Docebo Connect advising you that you may apply the changes made to the original recipe to your clone, if you so choose.
For more information about cloning recipes and editing the cloned recipes, please see Docebo Connect: Copying recipes.
Migrating recipes between environments
Docebo Connect is built on Workato's underlying technology, but the connectors, recipes and lookup tables available in Connect are productized and maintained specifically within Docebo's controlled environment.
To move a recipe, a folder of recipes or a lookup table from one Connect environment to another, for example from your sandbox to your production platform or the reverse, submit a migration request to Docebo. If you're in the onboarding phase, send the request to your Professional Services (PS) contact. If you are already live, send it to your Customer Success Manager (CSM).
What you can migrate
Item | Can it be migrated? |
|---|---|
A single recipe | Yes |
A folder of recipes | Yes |
A lookup table | Yes, without values |
A connection | No |
Environment properties | No |
Home assets, Examples and Enablement Labs folders | No |
Please note:
A Connect recipe migration is a separate request from a Docebo sandbox sync. Syncing your Docebo platform and sandbox does not migrate or overwrite anything in Connect. If you need both, request them separately and specify which environments are involved for each.
Information to include in your request
When you contact your CSM or PS contact, include:
The source and target environment, for example sandbox to production or production to sandbox
The URL of the source environment and the URL of the target environment
The name of the project or folder you want to migrate
The name of the project or folder where the recipes should be created in the target environment
Any recipes in that project or folder you want to exclude from the migration
The name of any lookup table you want to migrate
What happens during a migration
A migration can run in either direction and can include a single recipe or several at once.
A recipe's name is its unique identifier. If a recipe with the same name already exists in the target environment, the migration overwrites it and the overwritten recipe keeps whatever active or inactive status it already had. If the recipe doesn't already exist in the target environment, the migration creates it as inactive.
A connection's name is also its unique identifier, but connections themselves are never migrated. If a migrated recipe uses a connection whose name matches a connection that already exists in the target environment, the recipe starts using that existing connection instead, even if the two connections point to different systems. If no connection of that name exists in the target environment, you'll need to configure one before the recipe can run. Because of this, always check and, if needed, reassign the connection used by a migrated recipe before you activate it.
If you migrate a lookup table, only the table itself (its name and structure) is migrated, not its values. If a table with the same name already exists in the target environment, its existing values aren't changed; you'll need to re-import the table's data after the migration, so it's best to export a copy of your lookup table before requesting the sync.
You can revert a recipe to any earlier version at any time from the recipe's Versions tab. For more information, see Comparing different versions of a recipe.
Best practice:
Ask for your migrated recipes to be placed in a dedicated folder in the target environment. This way, they arrive inactive and won't overwrite your existing recipes right away. Once you've tested them and reassigned the correct connections and lookup table values, you can turn off the recipes you're replacing, activate the migrated recipes and move them into their permanent folder.
Updating a recipe
Access Docebo Connect by pressing the gears icon in the top right corner of your screen, locate Docebo Connect and press Manage. Then, locate the recipe in your project folder and press the ellipsis button and choose Stop Recipe. Next, open the recipe to be updated, you will see a message stating that updates are available from its parent recipe. Press See details to access the screen where you can update.
.png?sv=2026-02-06&spr=https&st=2026-11-12T13%3A50%3A44Z&se=2026-11-12T14%3A08%3A44Z&sr=c&sp=r&sig=HKLhkKF5rtkwdgTtaGbJuSgrB40HEXWpBjV2H1qQ3Qo%3D)
In the following screen, press the Install button to update the recipe to the latest version. If you wish to revert back to a previous version after updating the recipe, you can access the recipe's version history and choose an earlier version at any time.
.png?sv=2026-02-06&spr=https&st=2026-11-12T13%3A50%3A44Z&se=2026-11-12T14%3A08%3A44Z&sr=c&sp=r&sig=HKLhkKF5rtkwdgTtaGbJuSgrB40HEXWpBjV2H1qQ3Qo%3D)
Please note:
Updating a recipe to a newer provided version will overwrite any customizations made to the recipe. If you have updated a recipe and require the previous version to be restored, please see the chapter Reverting a recipe to a previous version.
Reverting a recipe to a previous version
In order to revert a recipe back to a previous version, enter the recipe and press on the Versions tab. There you will be presented with all the revisions of the recipe, when they were created, what changes were made and who made the change. You will also be able to see which version is the current (or in use) version of the recipe.
Press on the version of the recipe you wish to restore to the current version and then press the Restore this version button.
The previous version has now been restored.
Comparing different versions of a recipe
In order to compare different versions of a recipe, for example in order to familiarize yourself with changes or check for the necessary porting of customizations, enter the recipe and press on the Versions tab. There you will be presented with all the revisions of the recipe, when they were created, what changes were made and who made the change. You will also be able to see which version is the current (or in use) version of the recipe.
There, place a select the checkbox next to the recipes you wish to compare and press the Compare button.
You will then be presented with the selected recipes in a side by side view, allowing you to compare any changes in detail. You will also be able to press the Restore button to revert back to the previous version, if you choose to do so.
Starting a recipe
To start the recipe, locate the recipe in the project folder. Next, press on the ellipsis button at the right of the recipe and in the resulting drop-down menu press Start recipe.
Stopping a recipe
To start the recipe, locate the recipe in the project folder. Next, press on the ellipsis button at the right of the recipe and in the resulting drop-down menu press Stop recipe.
Editing a recipe
To edit a recipe, for example in order to adjust the run-time of the recipe, locate the recipe in the project folder. Next, press on the ellipsis button at the right of the recipe and in the resulting drop-down menu press Edit recipe.
You will then be brought into the recipe editor where you can make changes to or test the recipe before you start it in production.
For more detailed information on editing recipes, please see the Workato Knowledge Base (opens in a new tab).
Deleting a recipe
To delete a recipe, locate the recipe in the project folder. Next, press on the ellipsis button at the right of the recipe and in the resulting drop-down menu press Delete recipe. In the following confirmation dialog, press Delete recipe again to finalize the deletion, otherwise to avoid deleting your recipe, press Cancel or click anywhere outside the drop-down menu.
Adjusting the run-time of a recipe
To adjust the run-time of a recipe that is triggered at a specific time, enter the recipe editor and press the first element in the recipe, marked Trigger. In the resulting side-panel, scroll down until you locate the Trigger at field. There you can change the value to whichever time you desire.
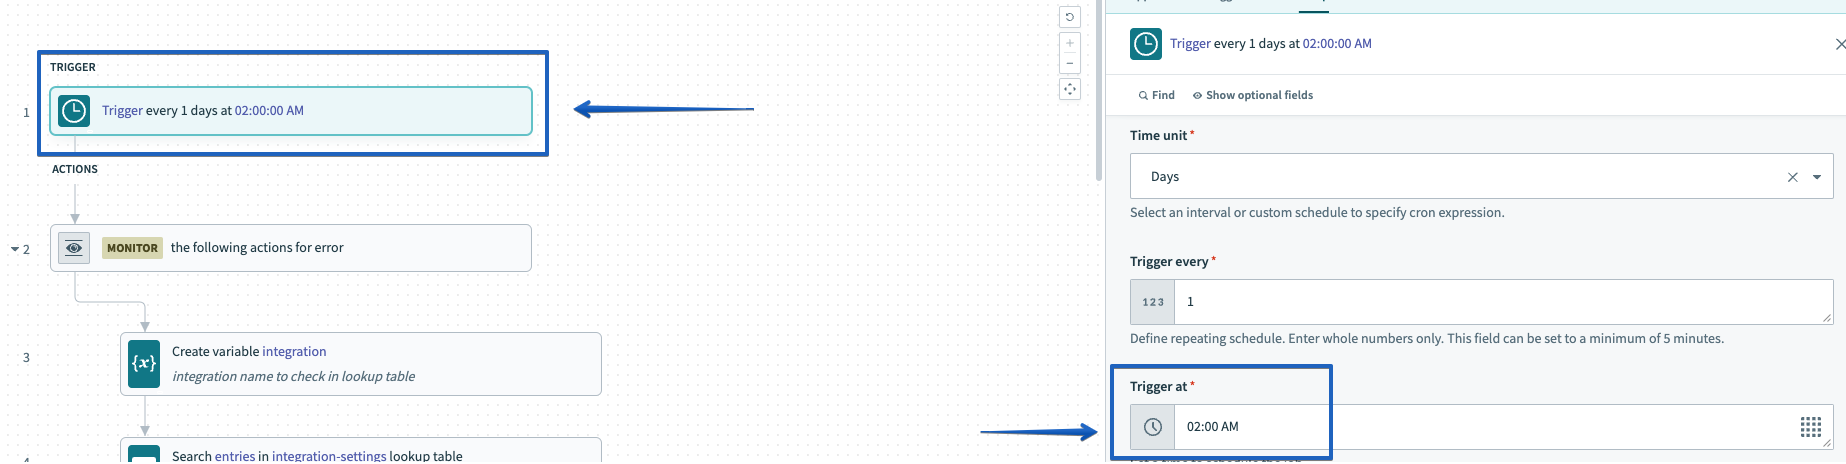
Once you have entered the desired time, press the Save button located in the top right corner of the recipe to commit your changes.

Adjusting the timezone of a recipe
To adjust the timezone of a recipe, enter the recipe editor and select the first element in the recipe, marked Trigger. In the resulting side-panel, scroll down and press the + 2 optional fields available button.
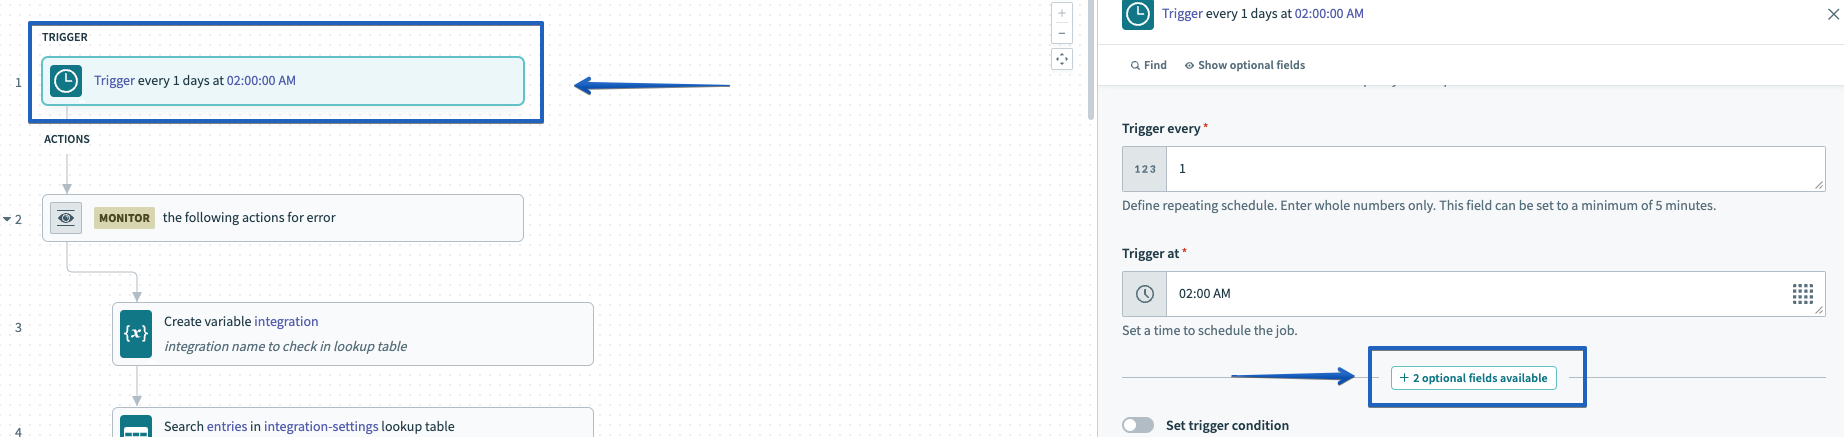
In the resulting modal window, select the checkbox next to Timezone and press the Apply changes button.
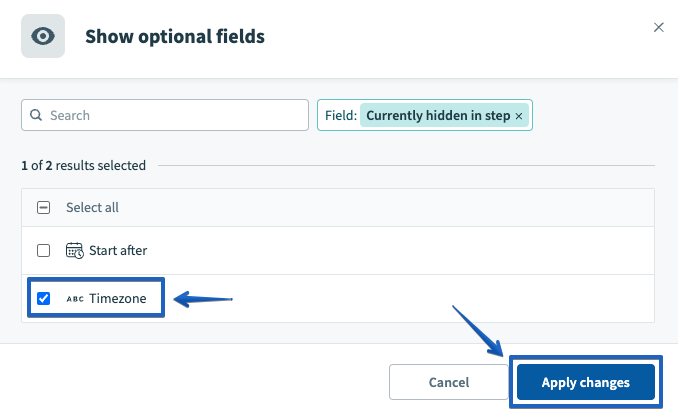
Returning to the previous sidebar, you can now press the down arrow in the Timezone box and locate the timezone of your choice in the resulting list by scrolling up or down.
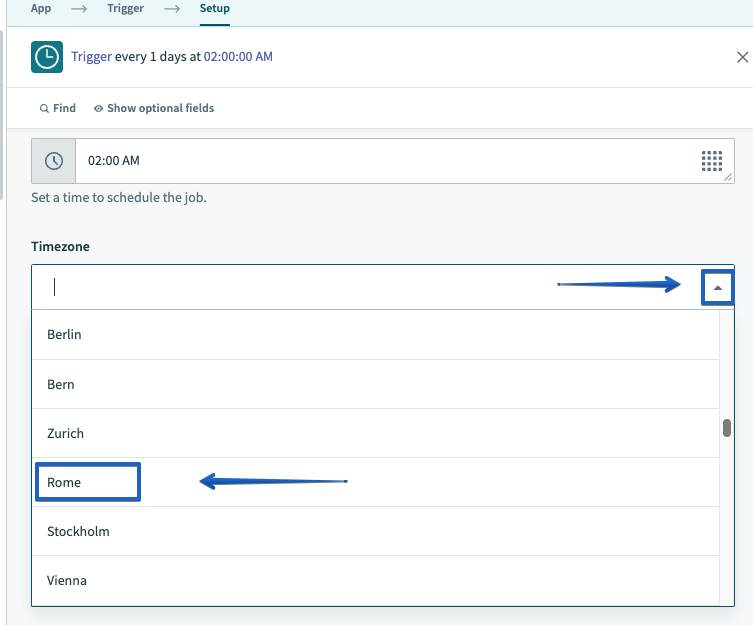
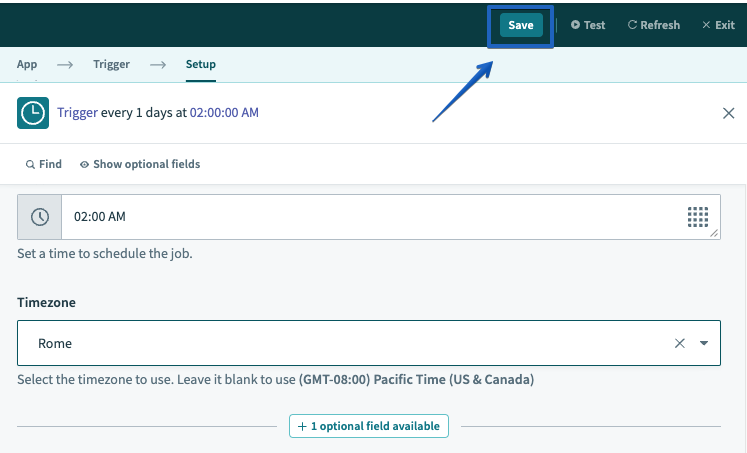
Next press the Save button in the top right corner of the recipe editor to commit your changes. Your recipe will now trigger at the specified time in the timezone you have assigned to it.